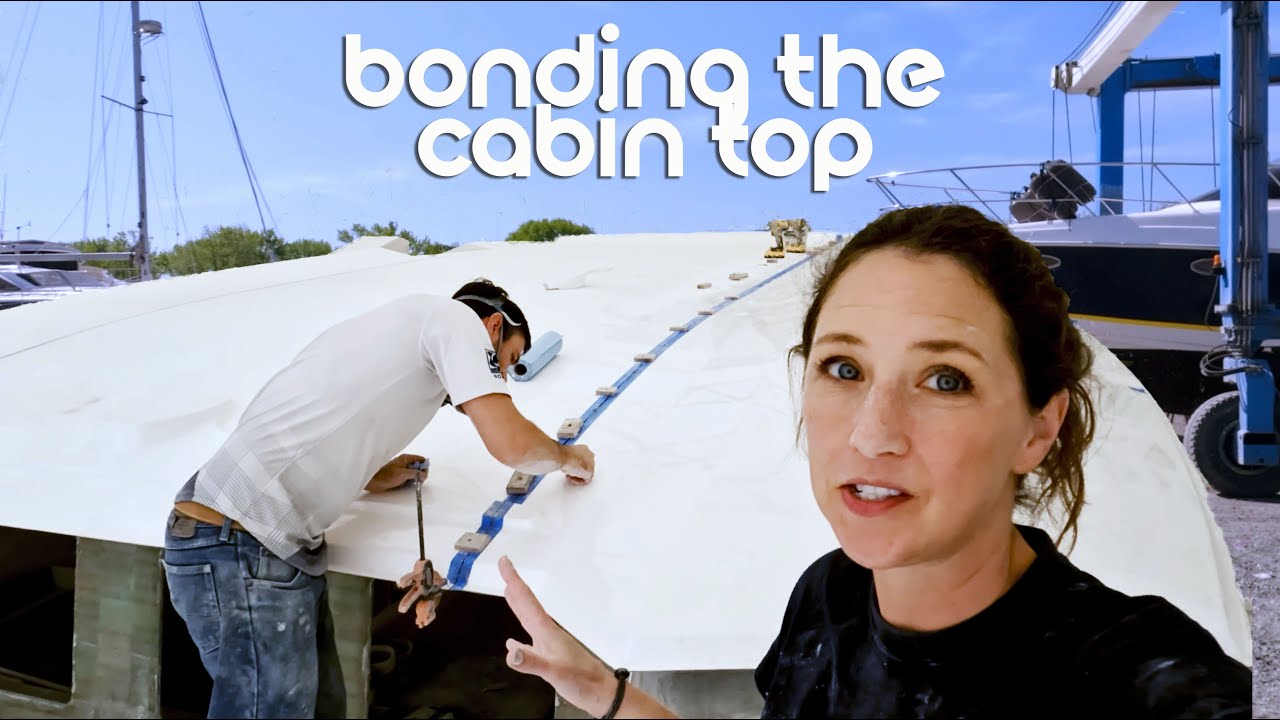
1.000 USD de agent de legătură în mâinile noastre și o șansă de a nu da peste cap asta. Matt și cu mine am fost destul de ocupați în ultimele câteva zile (tocmai am terminat acest proiect ieri) și am folosit vremea caldă de care dispunem pentru a sparge din nou agentul de lipire metacrilat. Este adezivul pe care îl folosim pentru a lipi toate piesele din carcasă înainte ca acestea să fie sticlate. Cea mai mare parte a bărcii A fost asamblată în acest moment, dar încă mai avem cu care să ne confruntăm cu capacul foarte mare al cabinei. Înainte de a-l putea atașa la barcă, trebuie să lipim cele trei piese separate împreună. Matt își petrece câteva zile pregătind flanșele suprapuse, iar apoi suntem gata de plecare. În această rundă avem norocul să avem un nou lot de metacrilat cu un timp de lucru mai lung, trecând de la 45 de minute anterior până la 90 de minute acum. Și pentru prima legătură avem nevoie de fiecare minut, deoarece lucrurile nu se aliniază așa cum ar trebui. Sperăm să vă bucurați!
source
CATAMARAN BUILD – Aceasta ar putea fi o greșeală de $$ (MJ Sailing – Ep 281)
31 thoughts on “CATAMARAN BUILD – Aceasta ar putea fi o greșeală de $$ (MJ Sailing – Ep 281)”
Comments are closed.

Wow now that is a huge roof section
Certainly shows how big the Cat HUGE
No need to apologise for the yellow adds to the effects
Have a wonderful Sunday and a great week ahead.
All the best
Why do people have such issues with Falanges? They never bothered anyone. Hey, if you guys haven’t decided on a name yet, I have an idea.
Most of big pieces like this top were cut due to shipping to you in a container. How do they build these Catamaran at their ship yard as one piece or they still cut and glue together? These pieces are made via uni body molds so not sure if Max cruise ship building and body molds are at same location?
Grand, really MOJO impressive, so Happy for you both.
I feel your pain. Dry fit, ok, final assembly, not ok. Stay safe, and we'll see you next week.
great video……hey are yalls friends tula's endless summer coming to help work on yalls boat wile theirs is being finished?
to whiten gelcoat mix a handful of oxcalic acid with a gallon of water, wear gloves and wipe on with a sponge or rag then wait 20 minutes, wash off with water.
You have a roof!!!! Great advancements
Great to see the progress. Those big pieces get one shot at getting it right. Nerve-racking for sure. This month I'm going to make a test piece that simulates bonding a framed piece with a planking piece using Thixo for the peanut butter mix in the seam and also using Thixo for wetting out the two-inch fiberglass tape for the corners. I have decided on this skiff build I am rounding every edge of every frame allowing the planking to meet the rounded edge as it changes for the sweep of the hull evenly. Understanding the process of stitch and glue boat building using bulkheads as frames using filet style joints, why not for frame building also? A special tool will place the screws in alignment with the frames, not the planks. Pre-Notching all the frames with a router and using 5/8th lumber should result in a fair sight line down the length of this skiff 23ft. I wish I could get excited about doing a video but maybe as I get something worth showing I might.
HI guys, nice work. For your video being yellow this may be the problem. About 15 years ago I was on a project that involved building a custom designed digital camera. There was an issue with yellow tinting in the images. The electronics engineers worked out it was a power supply issue. I can't remember if it was low voltage or low amperage but that caused the problem – it affects the sensor somehow (I'm IT not electronics so don't understand that stuff). Maybe if it happens again take note if the batteries are old (maybe end of life) or the state of charge at the time. Just an idea, cheers.
Props to yall! Unless its like 10 percent of the cost of a factory finished boat I would never consider building one from a kit like yall! Great work but wow wat a ton of work! Looking good and you guys have way more patience than me
The white balance ( lighting color ) is what needs to be adjusted . Usually it is the camera setting jumping around when it is set to automatic and camera is panned to different diffused light color shades .
Quote of the build to date, "It's amazing how much better things go when your expectations are low". Love it Matty. Wetsand out the bubble wrap stains with 1200grit before polishing if they don't clean up before hitting the sun.
Loved the comment. " You won't see the join when it's covered in Solar!" So so true.
M&J – MAC is for structure, not looks. Connecting the structural laminates of each shop produced part has to be the goal. It's NOT putty!! Glad to see you executing these MAC bonds and the good flange details you were given by the shop!! Just think, you just completed the single biggest MAC project stateside this year. You can be a consultant!!! Back to grinding, fairing and gel coating!!! Will it ever end??? Hope so.
you need one on the otherside to match !
Do no see a color problem in video.👍👌
Clickbait heading again
I understand your passion but this size boat project needs professional boat builders who knows the fibreglass!
I appreciate the quality of the videos guys. I'm gonna share a thought about how Heroic it seems your effort is there. ~ Just thinking about another build over there in V.N. ~. Lots of people ~ I wish an army of volunteers to descend upon the project. There's that teak 250 foot boat in Costa Rica with so many skilled people working. Both of you have excellent communication skills. And amazing skills generally. I don't know. Maybe "put out" that you have a need for three crews of ten people each with very specific task areas and then manage them. I just don't know. Heroic really. If I were younger. An army, that's what you need. I pray that you both will be able to live happily ever after. God Speed. ✨🙏✨
MJ, glad to see you guys are making progress. Regarding the lighting, a couple people have said, they wouldn't have noticed if you hadn't said anything, which is true. I think someone else said, White Balance, which is possible. You all are working under a giant light box powered by inconsistent natural light. You are also going from DSLR to GoPro. Light temperature, tint, saturation is changing constantly. For still photography this is great, for film or video it is more challenging.
All in all, your editing is great, sound levels are great. I wouldn't worry about.
How long have you been doing this for?
As far as the color grading thing, my answer would be modulated by the video editing software you use and your knowledge about white balance. I use PowerDirector 21 for my videos, it's feature pack for the semi-pro while easy enough to understand. Not an ad, it's just my personal opinion.
looking great
Simply amazing!
It’s looking great. It’s nice to see sometimes things go as well as they are planned!
Donate for a Dream
The colour shift in the tent is white balance, try just re-setting white balance on the effected clips without any other correction or grade, easy in Davinci, no experience with PS. The best way would be to take a couple frames holding a reference card in those areas/clips where you expect the shift to occur, and correct to the card in your editor.
That looks stressful and exhausting
Love the videos and time you guys are taking to get this near perfect. Does the kit include the mast and rigging or do you get those items after you've completed the main boat?
Love those big sunglasses, classy cool!!!! Given the methylacrylates properties of slightly lower heat usage envelope it occurs to me that sitting the solar panels right on top of those flanges could be problematic. Some panels I have used do get extremely hot, like a baking sheet! Since solar panels also degrade in performance when too hot it made me wonder if a thin water based heat absorbsion layer under the the panels would make sense. It could double as a hot water heater or pre-heater. It's amazing how much we learn from watching these videos, Matt you are awesome for explaining all these steps! Jess you continue to stun us with your video work and comments, much appreciation, you are creating an amazing body of work! Oh, and thanks for the cool T-shirt, I really like the graphics, did you design those? I was thinking it would be fun to make them 3D and animate them with a ray tracer.
For the Yellow Colour. If in Premiere Pro go to Lumenentry Colour > curves > hue vs hue curve > eyedrop the colour and pull toward the green then > open Hue vs Saturation > eyedropper > pull key frame gown.
The best way is to shoot a chip chart or grey card and make a lut you can apply to the clips. This will work welI in Davincie resolve as Resolve can work natively with some colour chip charts. Once you have made a lut you can apply it in most all editors.
Edit: the xrite colour chart is ideal if you are still having issues.