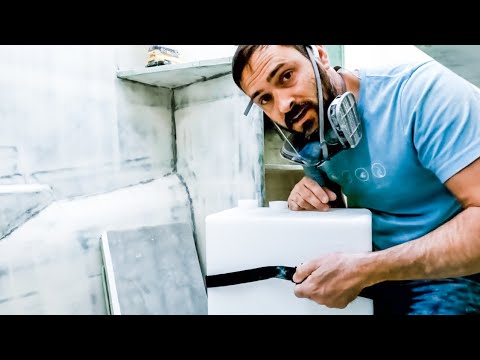
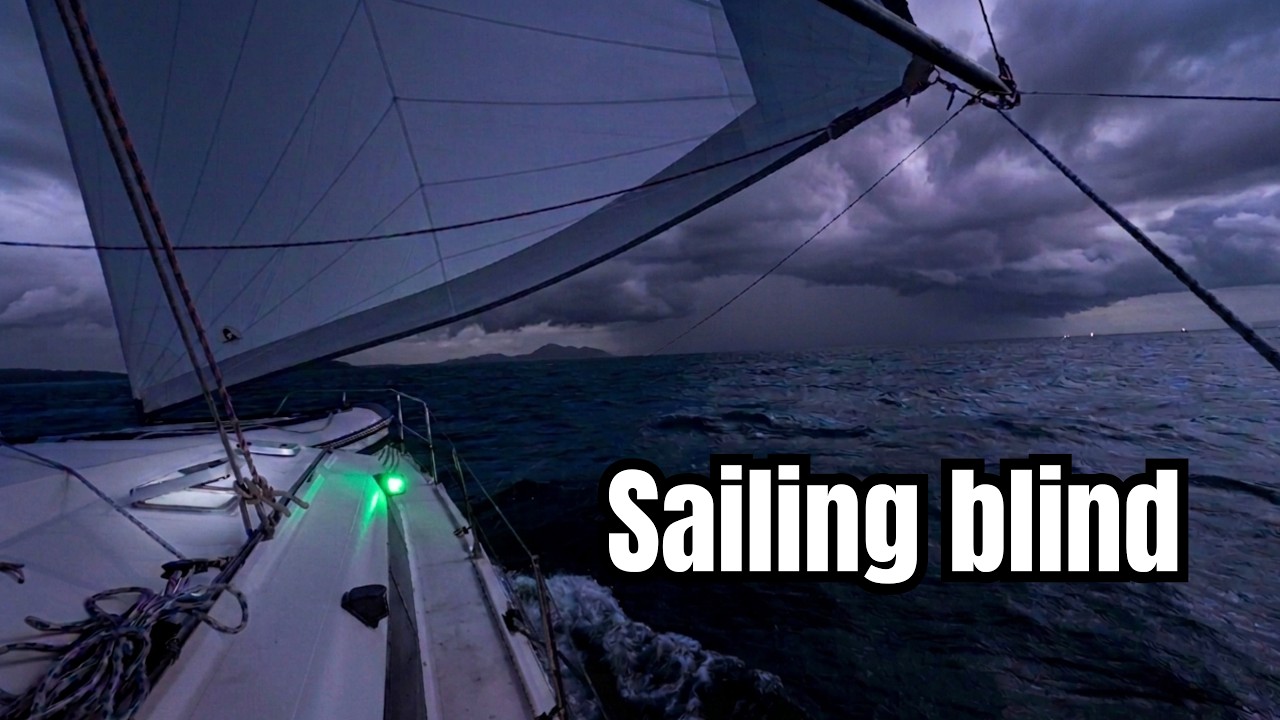
Ne străduim atât de mult să nu vă plictisim cu mai multe videoclipuri cu noi doar cu care și șlefuim, deși practic asta ne ocupă 90% din timp acum. Și, deși ar trebui să se desfășoare mai multe instrucțiuni foarte foarte curând, nu am crezut că veți fi interesat de ziua noastră marmotei de a perfecționa carcasa oaspetelui pentru ca acest lucru să se întâmple. Așadar, în episodul din această săptămână, ne concentrăm pe un proiect mai mic al rezervorului care vine pentru șeful nostru maestru. Am dezbătut atât de mult ce am vrut să facem pe această parte, deoarece spațiile sunt limitate și au forme ciudate. Până la urmă, am comandat unul prefabricat. Și de fapt se potrivește destul de bine într-unul dintre spațiile noastre deschise. Dar, după ce ne-am ocupat acum de greutatea suplimentară care vine cu el și de proiectele suplimentare pentru a-l asigura pe loc, ar fi fost mai bine să construim unul așa cum am făcut-o pe babord? Pentru un pic de distracție suplimentară, ne ieșim cu o oră mai devreme într-o noapte pentru a merge cu prietenii noștri ai lui Ryan și Sophie care navighează, acum s-au întors la Annapolis. Și în timp ce împreună, fiecare dintre noi poate să prăjim cu ceva special pe care ziua ne oferă. Speram sa va placa!! Link către barca noastră: https://maxcruisemarine.com/max42sc-sailing-catamaran/ Mulțumim MULT Patronilor noștri. Acești susținători extraordinari ne ajută să ne menținem pe barcă, echipamentele noastre de cameră la zi și videoclipurile care urmează. Fără patronii noștri, aceste videoclipuri nu ar fi posibile. Pentru a vă înscrie în rândurile Patreon, vă rugăm să vizitați http://www.patreon.com/mjsailing sau Cumpărați-ne o bere prin PayPal! https://www.paypal.me/MJSailing sau Ajută să contribui la construcție cumpărând Lista noastră de dorințe Amazon! Pentru construcție: https://www.amazon.com/hz/wishlist/ls/2B2BOYEH9THAH?ref_=wl_share Pentru barcă: https://www.amazon.com/hz/wishlist/ls/2E2TEAT8G9R1U Adresa de livrare: Kentmorr Marina 910 Kentmorr Road Stevensville, MD 21666 Vă mulțumim!, Matt și Jessica – Obțineți marfa: https://mj-sailing.myshopify.com/ Videoclipuri realizate de Jessica, cu Matt și Georgie. Muzică: Bull Head’s Bay – Roy Edwin Williams Rare Love – Cody Francis So Long Oklahoma – Roy Williams Pandemonium (Versiunea Tribute) – Echipamentul camerei de luni folosite: – Panasonic Lumix GH5 – Microfon pentru pușcă Shure VP83F – https://amzn.to/ 2rsIHLL – GoPro Hero8 Bărci anterioare: 1983 Trisalu 37 – aluminiu personalizat, construit în Quebec (Elements of Life) Unde am fost: 2,5 ani refit în Indiantown, Florida; Abacos, Bahamas; St. Barth; St. Maarten; Antigua; Saba; Azore; Irlanda; Scoţia; Norvegia; Anglia 1989 Sabre 34 Targa (Serendipity) Unde am navigat cu ea: SUA – Bahamas – Jamaica – Cuba – Insulele Cayman – Honduras – Guatemala – Belize – Mexic – Bermuda – Azore – Madeira – Insulele Canare – Sint Maarten – BVI – Software de editare USVI: Site-ul Adobe Premier Pro: http://www.mjsailing.com Facebook: http://www.facebook.com/mattandjessicasailing Instagram: https://www.instagram.com/mattandjessicasailing & https://www.instagram.com /mj_wayfaring/
source
Ar fi trebuit să construim singuri acest rezervor? (MJ Sailing – Ep 275)
44 thoughts on “Ar fi trebuit să construim singuri acest rezervor? (MJ Sailing – Ep 275)”
Comments are closed.

Grind those straps out and do it better .they need to slide at minimum . They will be cut off by the fibreglass. I don't need to say much more after reading the other comments. your ideas in your mind are good ,just the execution needs a little adjustment. We all learn from mistakes .
One easy trick to secure the tank is to first cover the inside of the room with normal PE plastiic film. Second insert the tank and use PU expanding foam around the corners of the tank. This wil secure the tank. As the tank is made from either PP or PE the foam will not stick to the tank nor the thin plastic film. When the tank need service, rip it out and ditch the foam. When the tank must be reinstalled, use the procedure above again 🙂
Will each hull have a holding tank? What is the capacity of the the tank?
Five eighths is a heavy duty tank for sure. I have a more general question regarding materials selection…fiberglass is the traditional material for small boat fabrication. When discussing boat building did other materials such as HDPE come up in the selection process. For example HDPE density is less than water (0.97) which would make the boat “unsinkable” and just as strong. I am just curious is all.
Wow Two years already of Cat building, that’s gone quickly.
Seeing what you have accomplished in that time is amazing.
Won’t be very long before we get the Grand Boat Tour.
Take care both of you and see you next week 😀😀
Blow foam?
Those straps are going to eventually tear where you fiberglass them to the cabinet wall. Would have been better to fiberglass and d rings, and then hook the strap to those. You could have used rubbers spacers between the cabinet walls and the holding tank.
What! Matt is speaking 🎉wow guess I’ve missed some vids,, Very good nice build , if I had the cash I’d send you bout 20 of the Vietnamese builders to move it along then I’d send them to Disney 😅
We want more sanding and fairing videos with skinny jeans. Maybe you can add a bow to the face mask, but we're still enjoying the boat build. 2 years of hard work and your putting together the million dollar marine craft.
Got to keep your S*** secure . Say it all the time .
Nice to see Sophie and Ryan. Polar Seal is just a few boats away from mine on the hard.
So good to see Ryan and Sophie again, I’m sure your brain will do so midnight engineering and you will come up with solutions that you will be happy with. Your Boat can mean, Your Best Options And Techniques.
Hi y'all great work! I have a little engineering tip about why you always space out the straps on a tank even if you never expect it to be full. Spacing out the straps makes the tank more stable because it's easier to resist rotation from both ends of the tank rather than just one. So while it may seem best to place both straps near the bottom where most of the weight will be. It's actually far stronger to have one strap on the top and one on the bottom.
You could maybe add some removable wedges to lock it in place also.
Erm – how do you get to the bottom of the tank when it is going to end up getting congested at the bottom of the outlet? That happens quite a lot in reality. You have left yourself no access point from the top which I always found necessary to put de-clogging equipment in from – you have to be able to give yourself a fair amount of room from the top to feel around things when things are going horribly wrong in my experience.
If you had built the boat as designed it may well have been close to finished now,
I might have done a spray in foam to hold the tank in place. or fiberglass loops so the straps can be replaced if needed.
So good you can catch up with friends! You work long hours for weeks on end.
Congrats on 2 years. Having a gravity drain on a holding tank, seems like a nasty mess waiting to happen. With sounding tube, the liquid is contained in the tank if there is a blockage. With a gravity drain how will you access the drain in the event of a blockage or valve failure?
There will always be unforeseen obstacles or changes to any large project just remain flexible and keep moving ahead as you are doing the one thing I can promise is this won't be the last just keep the final goal in mind.
I hope that you also will have a suction discharge option installed for the holding tank, so you don’t have to empty it into the sea. In Finland you have to have a suction discharge system installed.
Matt, You could have used cheap thin wall plastic tubes, heated and flattened to easily fit your straps of choice. Glass them in at the same locations, and then be able to tighten them more and replace them at will, just in case of a single failure. Great instructive content, thankyou!
Couldn't you have just used small strategically placed expanding foam to hold it in place making easy to remove if necessary?
Just my thought.
Maybe even making some top hat shaped strap loops that you could have glassed in making it easy to replace straps should they need replaced
Glassing in some “untested Amazon specials” to secure your holding tank is truly a disaster waiting to happen imo
Reason I will not buy a YETI like rotomolded cooler. Heavy, thick walls take away from inside space. Oh, and the ridiculous price. I can but 8 Igloos for the price of 1 yeti.
Matt, you need to watch the "DURACELL PROJECT" and scrap this catamaran.
I think the purchased holding tank is a good idea just in case it needs to be replaced someday.
It is so difficult to believe it's been two years. Time sure flies. I love watching you two build your new boat and look forward to watching you sail it. I'm so impressed with the knowledge you have and your work ethics. YOU ARE REALLY AMAZING!!!!!
Sorry mate but you need to revisit how you hold that tank in, the straps will tear at the fibreglass sooner or later, perhaps a stainless tray to drop it into and a retainer band with hold down tabs at the top end to keep it locked in place. It's going to get really ugly when the plumbing fittings fracture at the tank because it wasn't anchored properly, honestly mate you need to be doing your best work on these things, cut corners on the stuff thats easy to fix.
Two years of
building Your Dream Boat with your own hands
wow doesn't feel like its been that long, you just aged me two years 😛
Do we get points if we guess the wood supplier? My guess: Bell Forest
I think I would have just expanding foamed it in. Just my though for ease of doing.
Interesting I didn't know boats have separate holding tanks for each head. How does that work when your pier side like your live on boat currently you can't dump in the bay..?
Where’s the pump out boss ? How are you going to do pump outs ?
the lighter solution wouldve been going composting toilet. i cant understand why people choose to lug their shit around them. specially when you can dump it offshore without feeling like an idiot. 2 people raw sewage is garbage, not pollution. there is a difference. those massive cruise ships are eons more polluting than hundreds of cruising boats altogether. with composting you have the option of keeping the goods with you whilst on shore waters, and displacing it appropriately on shore. no plumbing, no tanks, no electric toilet to go wrong, less power used, less plastic used, less holes on the boat/hull, you can even integrate the composting toilet into your specific head foot print (building one is not that hard and well within your skills).
Sorry Mat that is the worst idea you have had, those straps are now useless to hold that tank, they will shear at the glue line very quickly. A thin piece of pre laminated glass strip forming a saddle is the way to go in that space, best fix that now while you have good access the straps should never be glued in place
Hey Soph..I think you are right with the 'Homely, don't pay any attention to the 'Homey' crowd.
Suggest glassing in a hard point that you can screw into. 2 years may seem “long” but you are doing great!
Are you really going to launch it incomplete next year? Perhaps hiring some people to help? It seems like the minimum to launch would include Installing engines, engine controls, exhaust and raw water lines, rudder/linkages/cables/autopilot, helm, helm electronics, hull joints fared/gel coat, all thru hull fittings, port lights, anti foul, deck rigging, railings/safety cables, cleats, windless/hardware, mast, mast rigging and electrical, mast tuning, batteries, power managment, running lights…I'm probably missing a lot just to get it sea worthy. Oh, and certified for insurance…which would have additional requirements.
Is there going to be a composting head on this boat?
Hi You Two! As always, thx so much for your channel!
As you plan your moves with your freshwater feeds, I have an idea you may wanna consider… there are scores of accumulator tanks out there, but I've done it differently (and much, much cheaper with similar results). I don't think we really need bladders (unless we wanna install at lower points in our system). What I've done a few times is choose a location that's out of the way and high up anywhere in the boat. Doesn't matter where. Maybe pick a closet or a lazzarette and buy as tall a piece of 4" Schedule 20 PVC piping as will fit up in a back corner of said compartment. Buy caps for both ends, a simple pressure gauge and a bicycle inner tube style of valve (Schraeder Valve), if you wanna get fancy. Put a 'T' at the bottom and let that hook up to any branch of your plumbing. As you run your system, any air will naturally accumulate in as high a point as it can find. Hopefully, your new PVC tank will be that high spot! You'll save $$$ and get much longer runs of pressurized flow with far less cycling…
squirt some expanding foam between the tank and the walls to eliminate any movement