Ieșit cu mucegaiul, cu noul. Readucerea pe picioare a acestei bărci veche mucegăite și rupte implică înlocuirea completă a unei părți din interior care era de nesalvat. Făcând locuri de muncă pentru prima dată, facem greșeli, ceea ce devine destul de evident. Învățând cum să lipim și să aplici acest PVC, greșelile vin foarte repede, dar învățăm la fel de repede. Prin toate acestea, continuăm să învățăm mai multe despre cum să reinstalăm o legendă clasică de croazieră în apă albastră. Aceste Amel Super Maramu au fost prin anii 90 una dintre cele mai mari nave de croazieră cu apă albastră care au fost produse. Suntem atât de încântați să aducem această frumusețe înapoi la starea ei inițială cât de mult putem. Ultima noastră navă, un Beneteau Cyclades 43, am reușit să împingem acea navă, probabil, mult mai departe decât au crezut inițial proiectanții că ar putea fi făcut cu o barcă care a fost făcută pentru industria de charter mereu profitabilă din Europa. Începând cu un vas care a fost conceput de la început pentru a ajunge în fiecare colț al pământului, suntem foarte dornici să o scoatem pe apă și să vedem ce poate face! Alăturați-vă echipajului https://www.patreon.com/SailingMerewether Patronii noștri sunt cei care fac totul posibil și fără ei, nu am fi acolo unde suntem astăzi. Când vă înregistrați, nu numai că aveți acces la toate videoclipurile noastre cu săptămâni înainte de public, dar aveți și o linie directă cu noi și încercăm să ne cunoaștem pe toți patronii noștri. Pune-ne o întrebare, dă-ne un sfat spune-ne ce vrei să vedem, ne place să vorbim cu echipajul nostru cât de mult putem. Mărfuri, cămăși și multe altele https://sailingmerewether.com Paypal https://paypal.me/sailingmerewether?country.x=AU&locale.x=en_AU Instagram https://www.instagram.com/sailingmerewether https://www. instagram.com/neeisabelle https://www.instagram.com/kieranwyse Facebook https://www.facebook.com/sailingmerewether Sponsori și colegi din Marea Britanie Sailmakers – https://www.uksailmakers.com Predict Wind – https:// www.predictwind.com
source
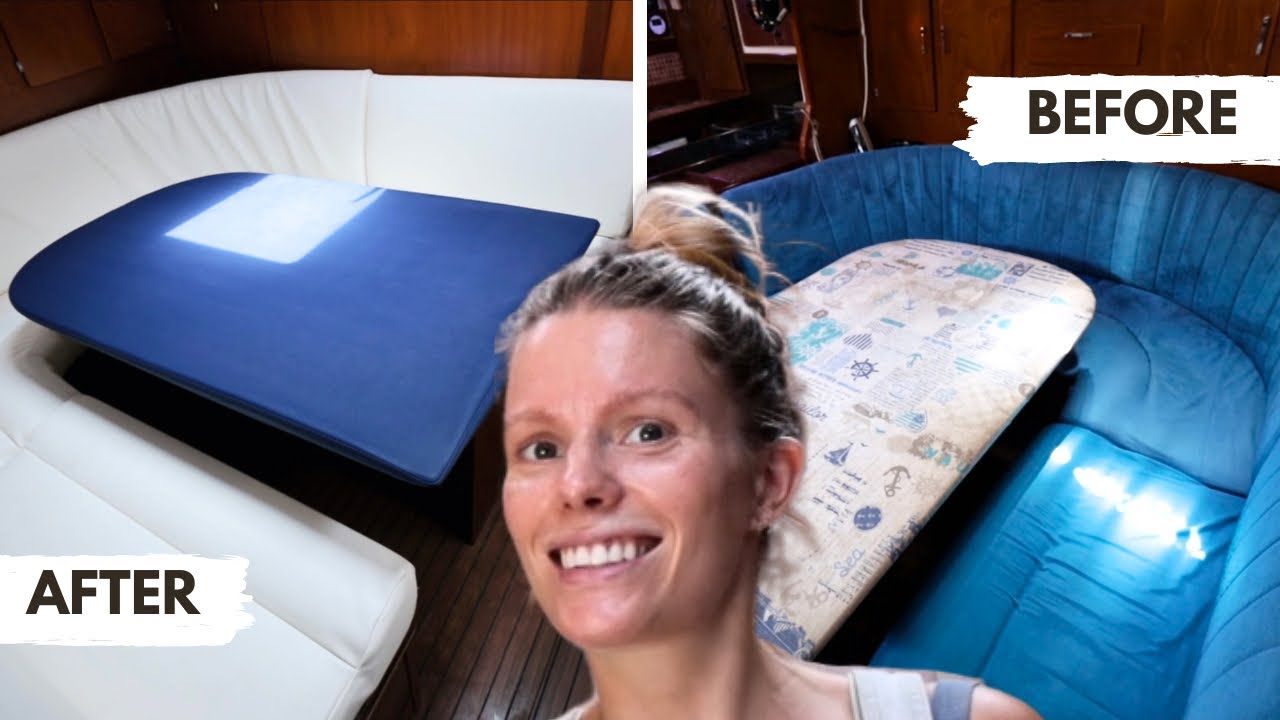
OUT with MOLD in with NEW (Fresh Interior!)
49 thoughts on “OUT with MOLD in with NEW (Fresh Interior!)”
Comments are closed.


Foam rubber is placed between the surface and the fabric so that it is neat. Good Luck
You also need a sharp blade to cut the PVC vinyl.
I think it would have been easier to sand and paint those parts of the boat white.
The old trial and error. But, you are getting it done.
When all else fails, read the directions. Allow the glue to dry before applying the vinyl material.
Surgical scalpel are the best to trim the edges and a roller to smooth out "STAY SAFE"
There are wallpaper people and paint people. Me … I’d have sanded smooth, applied a smoothing compound and painted. But that’s just me. If you like the quasi wallpaper, then it looks very nice. I’m looking forward to seeing you address the gaps behind some the the wood that was likely hull damage.
it is amazing how much more productive the A/C unit allows you to be productive hey?
I am happy you all decided to come back to the sea…get a Sailrite sewing machine…use the machine to put stitching edges on the panels.. so when you glue them… the edges will be a uniform border.
The wallpaper is called Liner
Contact cement is a great product . They make a waterbace type as well. I did this type of work for a living and have found that multy purpose flooring adhesive was great for the job. Same stuff you would use to install vinyl flooring with. Can be removed and adjusted for fit. Very little smell water cleanup and use a brush or roller dont use a notched trowel Exterior type. Cheap$$ Like you great efforts!
Great video
wouldn't just white color do it as well? ✌️👍
If you use a trowel into the wall and cut the vinyl at that edge it will be even …😊
Looks awesome!
The couches look great if you or a friend did it, if it was paid for and done by a "professional " upholsterer I wouldn't be paying the bill. Sorry to be PI but it's far from acceptable work from a professional.
Nice video guys. Well done for limiting the drone shots. I like the idea of white furnishings and walls to contrast with the dark wood. And you were right to have blue on the table to add a bit of depth. She is going to look good!
The contact cement you're using traps air in behind the surfaces as it dries and creates air bubbles Been there done that . I've found just let it dry and roll out the space with a vinyl roller. Good luck
White …..hmmmm. Better cover it during the refit.
The new couch covering is looking real nice . I think Harry should take out the wrinkles to give it that perfect look . Doing the walls in white is without a doubt a great choice in colors . It will look so nice against the wood interior of the boat . I know it's going to seem like it's taking forever to get the boat ready to cross oceans , and it probably is , but when you are finished you will have one hell of a blue water boat that you will be so proud of, mainly because you did it yourself . Great job so far guys . Stay steady and you will get there .
Try using spray on contact glue for easy application. Good job.
You guys are doing a great job on that Amel. Its going to look (and feel) brand new when you are done.
They make an upholstery contact adhesive that you allow to almost completely dry to the point it is barely tacky and you use a steamer to reactivate the glue so you can work it and stretch it and then you do your final trim of the edges. I normally use an olfa knife to trim the edges.
Did you run a firm roller over the vinyl to evenly spread the glue under the vinyl?
Looks so good! Super clean, this will be a beauty of a boat!
You should build wooden panels with the pvc, and screw on the boat. A thin and light wood, with a thin foam in between. Its easier, removable, and you will not have all that problems, and better isolation. Also white is very preaty when new, but will yellow after some time. Good job guys, all the luck.
I would have glued on some thermal insulation first. I used the 1/2" black foam floor mats that latch together only above the waterline because you do want condensation below the waterline.
that looks like contact cement, if it is its good to apply to both surfaces let it become tacky then adhere, but be very careful cause once it comes in contact you might not be able to readjust. stuff is crazy sticky
I'm really enjoying your refit! Awesome job.
You need to use a contact adhesive on both parts and allow to dry before sticking together.
To get straight cuts use a straight edge or a putty knife (5” or more) and stick it in the corner to guide the knife and cut straight
Not if it's necessary, but using vinegar to kill the mold as part of the prep wouldn't hurt.
Try a heat gun to smooth out wrinkles. Worked great in my RV.
I like drone shots. Going good y o u t w o. I don't have any advice but enjoyed watching. Look forward to your next❤❤❤❤❤❤
Are you rebuilding engine yourself
The bubbles are gasing while drying. I kept yelling but you couldn’t hear me. You did it right up until you placed the lining onto the wet adhesive, you went wrong when you didn’t then remove it and wait for it to go touch dry. That’s why you use more than you think, you have to wet both surfaces by placing the dry lining on the over wet hull. A steel rule helps with cutting the edges with a very sharp knife.
You have to love a clean white surface🤙🏼🤙🏼 how is the deck repair going??
You could try reading the instructions on the adhesive that usually helps.
people please don't do it like this you need a pressure roller for even the glue on the wall so your vinyl dont look like crap.
AS Garryundy1777 said. you need to coat both sides, wait for it to be tounch dry and then stick it down. As an aussie would say. (It should stick like shit on a blanket)
A beautiful boat. A fantastic project. Like all big jobs this is physically difficult. But I believe it's by far more difficult mentally. You are doing so well. Inspirational!!!
It's all starting to come together; you guys are Making it happen! Great job!
As to the wrinkles in the settee back, the guy who made the cushion set should be able to use a steamer to get the wrinkles out. A couple other comments regarding the installation of vinyl on the sides and overhead. First, next time you need to replace it (and you will) the manufacturer should have a foam-backed version of what you are using. Second, as commented elsewhere, you MUST apply the contact cement to both surfaces and allow it to touch dry before installing it. And I definitely would not use vinyl anywhere near a cooking surface. I urge you to take a look at some of the Sail Life videos because Mads has seen and done it all. He does great DIY instruction as he takes on various projects.
A great knowledge source for all things fabric on a boat is the Sailrite videos on their website. For instance their video: Installing Vinyl Fabric As a Boat Headliner
I use a flexible 8" drywall putty knife to trim the edges. use the blade of the putty knife to tuck the vinyl tight in the corner and use a snap knife or utility knife to cut along the edge of the putty knife. makes a perfect strait cut. just move along the corner in 4" segments to do long cuts.
A tip when cutting the extra vinyl in the corner, lay a metal ruler or a wide putty knife on the part you keep and use a sharp blade to follow the edge of the metal.
Now, you will both need a change of clothes and wash your dirty hands before touching or sitting on that White couch… hmm not a good colour at all… I guarantee there will be marks on it within the first week…… for the wall coverings you need to use contact cement and put it on both surfaces let it sit until it gets tacky and then apply the covering to the walls, if not done like this then it will bubble and also come off in a matter of weeks…. you also need some sort of roller or I used to use a piece of wood about 300 long with rounded edges and used it for smoothing out things.. start at the centre and work outwards, Yes the fabric will stretch when fastening. When trimming the fabric after it has stuck use a straight edge (a metal ruler or similar) and cut along that and it will look much cleaner and neater.. Aussie Aussie Aussie……..
That glued on vinyl looks like shit, rip it off and do something different! As a fellow Aussie you’re making us look bad 😂 And…read the instructions on the glue tin. I bet it say to let the glue tack off!
❤❤🥰🥰