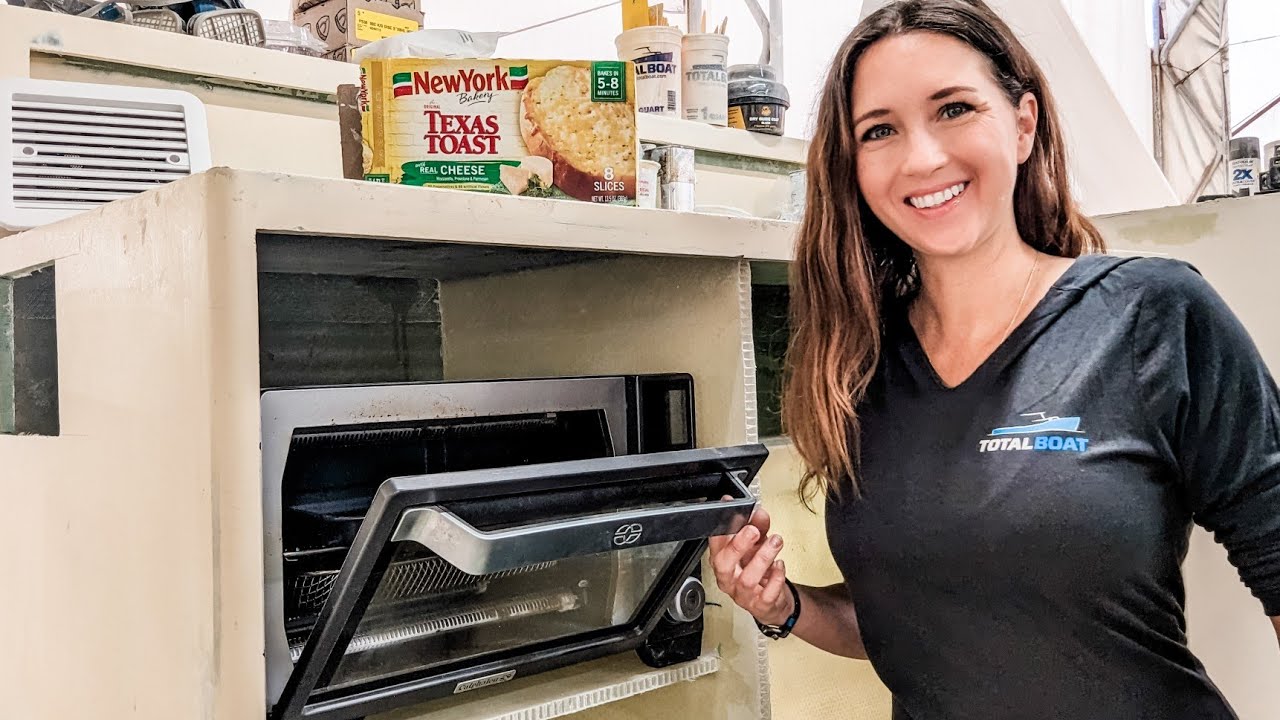
Nu este neobișnuit să depozitezi un cuptor cu convecție în interiorul unui dulap – dar ce zici de GĂTIT acolo? Am decis să aflăm în timp ce am construit un dulap personalizat în bucătărie pentru a folosi și depozita cuptorul nostru cu convecție. Deoarece acum avem în mână majoritatea articolelor pe care le vom instala în bucătărie, putem construi pereți, dulapuri și rafturi în jurul acestor articole. Desigur, două dintre articolele MAJORE care vor fi instalate sunt frigiderul și congelatorul nostru. Și, deși nu sunt încă pregătiți să intre, le avem la îndemână și putem construi spațiile în jurul lor. Frigiderul nostru este un spațiu de 5,1 cf, care va ocupa marginea din față a părții interioare. Cu toate acestea, congelatorul nostru este puțin diferit. Nu este un sertar, ci o unitate de încărcare superioară – deși nu o vom accesa de la tejgheaua noastră. În schimb, îl vom scoate într-un sertar lângă spațiul de podea al acestei zone. Pe partea exterioară, amenajăm unde vor fi chiuveta, gunoiul și mașina de spălat vase – deși un accent mare în această săptămână este pe cuptorul nostru cu convecție. În loc să-l păstrăm pe blat, sau chiar să îl aducem dintr-un dulap pe blat atunci când vrem să-l folosim, plănuim să-l păstrăm permanent într-un dulap, chiar și în timp ce ne gătește mâncarea. Dar poate acel spațiu să suporte căldura? Pentru a ne asigura că, de fapt, nu ne va cauza probleme, nu numai că am tăiat un spațiu pentru un ventilator care se va porni automat în acest spațiu atunci când temperatura crește – dar vrem să testăm că este încă în siguranță chiar dacă aerisirea trebuiau să eșueze. Nu ne îngrijorează că va începe un incendiu în această zonă, dar avem îngrijorări că spuma va deveni slăbită la temperaturi ridicate. Pentru a ne asigura că nu devine niciodată atât de fierbinte, am efectuat un test al cuptorului care funcționează la 425 timp de 30 de minute pentru a vedea cât de fierbinte va deveni zona. Suntem încă în zona de siguranță? Conectați-vă la cel mai nou episod al nostru pentru a afla. Bucurați-vă!! Sperăm să vă bucurați! Link către barca noastră: https://maxcruisemarine.com/max42sc-sailing-catamaran/ Mulțumim MULT Patronilor noștri. Acești susținători extraordinari ne ajută să ne menținem pe barcă, echipamentele noastre de cameră la zi și videoclipurile care urmează. Fără patronii noștri, aceste videoclipuri nu ar fi posibile. Pentru a vă înscrie în rândurile Patreon, vă rugăm să vizitați http://www.patreon.com/mjsailing sau Cumpărați-ne o bere prin PayPal! https://www.paypal.me/MJSailing sau Ajută să contribui la construcție cumpărând Lista noastră de dorințe Amazon! https://www.amazon.com/hz/wishlist/ls/2B2BOYEH9THAH?ref_=wl_share Adresa de livrare: Kentmorr Marina 910 Kentmorr Road Stevensville, MD 21666 Mulțumesc!, Matt și Jessica Videoclipuri realizate de Jessica, cu Matt și Georgie. 00:00 – Unde va sta frigiderul nostru unic 02:00 – O unitate de congelare cu deschidere superioară 04:54 – Sertare de bucătărie și piese 05:25 – Chiuvetă, gunoi și mașină de spălat vase 06:10 – Dulap personalizat pentru cuptorul nostru 07:55 – Adăugarea un aerisire 09:45 – Termostat rapid pentru controlul temperaturii 11:18 – Ne va distorsiona căldura spuma? 16:23 – Se caută ventilații cu stil 16:48 – Muzică de închidere: Summer Knot – American Legion Pandemonium (Versiunea Tribute) – Echipamentul camerei de luni folosite: – Panasonic Lumix GH5 – Microfon pentru pușcă Shure VP83F – https://amzn.to/ 2rsIHLL – GoPro Hero8 Bărci anterioare: 1983 Trisalu 37 – aluminiu personalizat, construit în Quebec (Elements of Life) Unde am fost: 2,5 ani refit în Indiantown, Florida; Abacos, Bahamas; St. Barth; St. Maarten; Antigua; Saba; Azore; Irlanda; Scoţia; Norvegia; Anglia 1989 Sabre 34 Targa (Serendipity) Unde am navigat cu ea: SUA – Bahamas – Jamaica – Cuba – Insulele Cayman – Honduras – Guatemala – Belize – Mexic – Bermuda – Azore – Madeira – Insulele Canare – Sint Maarten – BVI – Software de editare USVI: Site-ul Adobe Premier Pro: http://www.mjsailing.com Facebook: http://www.facebook.com/mattandjessicasailing Instagram: https://www.instagram.com/mattandjessicasailing & https://www.instagram.com /mj_wayfaring/
source
Suntem nebuni că ne folosim cuptorul în interiorul unui dulap? (MJ Sailing – Ep 304)
45 thoughts on “Suntem nebuni că ne folosim cuptorul în interiorul unui dulap? (MJ Sailing – Ep 304)”
Comments are closed.


Nice test, and it's always cool to design the galley based on past experience. I would have taped your vent fan to cover the hole you cut on the side to better duplicate the as-finished conditions, but you're probably still well within limits. Also, in a recent show by Engine Masters, they tested 'reflective' heat shields, like the kind of stuff you'd attach to the floorboard of your car to keep exhaust and engine heat out of the interior, and discovered that all the 'reflective' shields actually conducted more heat to the interior than reflected. They tested a product that had a thin layer of actual insulation in it, and that worked best. Air, they concluded, is your best insulator,
Engine Masters recently did a test of various stick-on products to stop heat transfer from the engine compartment. Most failed, and two products actually caused a temperature rise !! The conclusion was that the product that had some insulation (thin layer of fiberglass) on the back was best
Matt (8:00): "🎵My life is metric now🎵"
Matt's very next measurement moments later: "one inch down" 😆
And Jess you absolutely rocked the editing on this video. Loved the graphics you added and the quick-flash back-and-forth between the model and your boat. Seriously, you could make money editing for other creators.
The oven just seems very low
Just a suggestion for improving the heat shielding around your oven (nice oven by the way, they’re great!) based upon experience in motorsports with hot things and composites in close company.
Unless you’re using a high temp resin, eventually the cabinet will suffer.
Stick-on foil will actually increase the substrate temperature under certain conditions.
The most effective barriers are either a low thermal conductivity material or an air gap behind a reflective or low thermal conductivity layer.
The air gap doesn’t need to be large to be functional.
A couple of products I’d suggest looking at are commonly used in very similar situations to your oven installation and are widely available.
One is embossed aluminium heat shielding, excellent with a 5mm air gap.
Another is aluminised glass fibre mat which is sold in sheets, is thin so adds little thickness to a surface if it’s adhered as a barrier and is often used to directly wrap exhausts and turbo hotsides, so it’s also extremely durable. Both are available on fleabay.
Neither weigh much to fret about, a few ounces for your application, no more.
I’d suggest lining all of the cavity surfaces with the aluminised glass fibre sheet and then adding a layer of the embossed sheet above the oven, using screws through the sheet and small standoff blocks to maintain an airgap.
All of this stuff is automotive lego really, so it’s cheap as chips, robust and works extremely well.
You may well find that fitted out as I’ve indicated you’ll be able to delete the extraction fan altogether, but even if you decide to retain one (it’s certainly not a bad idea) the extra barrier will help the long term durability of the composite cabinet anyway and give you peace of mind should the fan fail.
Hope that gives you a couple of options that you may find useful, it’s pretty much how I’ve done it in various boats and motorhomes for a long time now because it’s cheap simple and effective, which suits me because I’m both tight and lazy when it comes to my own stuff.
(Hell, I spend my life making automotive unicorns wee, the last thing I want to do at the weekend is make even more tricky stuff when I’d rather be sailing.😂)
Cheers, R. 😎👍🍻
Wondering if you guys would find a trash compactor to be more useful to you then a dish washer?
My question is if that little fan is rated for temperatures up to 125 degrees.
You can get special heat resistant paint as well that takes more temperature like 750c.
An idea for counter top vent – may seem a strange idea, but look at some designer shower tray drains
Can you add the vent at the top at the front? I have seen that before.
Does your unit, like my home fridge, have the ability to switch your fridge door from right opening to left opening, so it opens against the wall?
It’s good to start seeing how the layout is going to be and to have a better idea of what your thought process was/is on the various components your adding to your home-on-the-water. For the convection cubicle, it sounds like you’ve put a lot of thought into that space, but I don’t recall hearing anything about what the door cover will be. If you plan on leaving the door open while cooking, that might quickly become a knee-hazard and I wonder if putting some slats in the door would provide enough ventilation so that it could stay closed during the cooking cycle, but still allow enough airflow for the well-placed fan your adding to the back of the space.
You should try an Air Fryer my sister has a Ninja duo says it’s the best thing ever, cooks as well as an oven but much less power
What if your refrigerator ventilation exhausted through a small counter-top dorade nozzle?
Exciting stuff!
PS guys: Aerogel insulation will help protect your refrigerator & freezer space from tropical heat!😊
Hey, I have that sink! I put in a sink with a threaded hose adapter and a spray gun with a soap dispenser next to it,
You should install an automatic fire suppression system. 😂
Just a suggestion on your thermostat settings for the oven area. You may want to set your on and off temperatures a bit higher. In a tropical climate. If you get above 100* the fan would come on but getting below 85* could leave the fan running for days before you get below 85* to turn it off.
Will you be putting drinks in the fridge? this fridge is 5.1 Cubic Feet. A Cubic Foot of water is 62.4 pounds. The total liquid carrying capacity of this fridge is about 312 pounds. Will you skimp on the beverages carried too?
Only one little freezer?
Once you go drawers in the kitchen, you never want conventional doors again. I changed out my kitchen recently to an Ikea drawer system and mann, so nice and much better than getting down and schlepping through the inside for things way in the back. I would definitely go fridge drawers.
Clearly, no turkey for Thanksgiving. 😂
Full foil surround will reflect heat back to the oven and the foil itself will be a heat focus. I would line the top only with a sheet of 1-2mm stainless or preferably 2-3mm thick aluminium. I would also add a heat sync inside behind the fan. This way as the heat rises you catch it on a heat conductive material, and then the heat sync will assist with surface area for heat dissipation with the fan. Great to see the progress and ideas on the kitchen!
Greetings to the couple, from a subscriber from Brazil. Firstly, sorry for my poor, and partially translated English. I follow the construction of your boat with great interest, especially because I also intend to build a catamaran in the future. Specifically in the case of this electric oven that you two intend to install on the boat, it seems to me that it lacks efficient thermal insulation to be installed where you intend to install it. It looks like a countertop oven to me. But all may not be lost. I think you can build thermal insulation with the outside made of tin, and the inside filled with glass wool, or rock wool. This will also increase the thermal efficiency of the oven, making it more economical, and the fan will not be necessary. Insulate the sides, the top, the back, but don't forget the bottom too. I hope my suggestion helps in some way.
i think you are loosing a great opportunity to invest a bit more into a technautics system for your fridge-freezer. like you said: since you are building the spaces up you can build exactly according to specs whilst maximizing the volumes available, you could do all this by building and insulating the ice box yourselfs, placing the euthetic plate where most convient and routing the compressor unit where you need. also it would be top loading which is more effiicient than side loading.
I'd have used an overhead half-time oven. It's a microwave and an oven in one, usually found in campers. They don't heat up your space very much, and the overhead mount can easily be ventilated outside.
the ventilation is important when you fit an oven in a cabinet …also the compressor will feel better with a cooling fan
Forget the fan and just insert some metal grilles in the worktop above the oven and use those to warm your plates as well as dissipate the heat.
Look at audio cabinet fans they have also temp control and auto fan adjustments. Very good idea for venting these fridge spaces.
Getting closer can't wait till it is finished and sailing
Flame retardant resins… Polyester and Vinylester resins are EXTREMELY flammable. They just mix in a flame retardant powder into the resin. It's just a powdered additive. Seriously the retardant does not do much. It's still a good idea as it's better than nothing, but only just. Once alight, Polyester and Vinylester will BURN FEROCIOUSLY regardless. If I had to enclose something like an oven in a fiberglass and resin cupboard I would also add a layer of safety like a fireproof insulator (like a tin or tin foil and fiberglass only (pink bat style) lining for the cupboard area to try to insulate the heat from the flammable Vinylester construction. Please do some checking on this.
Flashpoint for Vinylester resin is technically about 220 – 250 F (105 – 120 C) The amount that is raised by adding flame retardant is proportional to the amount of retardant added, but excess compromises strength.
To my knowledge, Epoxy is pretty much non-flammable (very different animal).
Please note, this is old information from about 25-35 years ago, but a quick check indicates it still seems valid.
I'm sure you already know, the worst thing that can happen on a boat at sea is a fire. Far worse that a holed and sinking boat. A fire CAN burn a fiberglass boat to the waterline and sink it in 15 minutes and CAN stop you from getting to your grab bag and supplies. The smoke is very toxic, thick, black and voluminous. It also burns HOT. It will drive you away from the boat.
I only mention this because I would hate to see that happen to you two. The fan pretty much makes that unlikely, but I would set the thermostat a little lower at the very least.
I spend many years in my youth working in the FRP (Fiberglass Reinforced Plastics) industry and in my father’s boat building business factory. I saw more than my share of fires in that time. Usually cause by carelessness, but once started a FRP factory simply becomes an exit ASAP site and by the time the fire brigade gets there is all over.
Please spend some time considering fire in that area and all the best with your audacious boat build.
Duct it out of the seat….on the other side.
How about a really good looking plastic plant in a nice pot, and make that into the vent.. nobody will notice the vent..
The crypto market is on the rise, with big names like Bitcoin and Ethereum growing a lot. But the market's ups and downs are making some investors, even the tough ones, feel stressed. In times like these, advice from experts like Jason Graystone fx can really help. Using is plan, I've been able to grow my portfolios quickly, with gains of over 15Btc. As always, doing your homework and making smart choices are important in this risky market, and Jason. is the guide you need for success.
Than vent and fan on the side will draw the excess heat and fumes out. So should be spot on.🤙🏼🤙🏼🤙🏼🇦🇺
Just an idea on the oven.
If you add additional quite dense Fiberglass insulation between the oven and the metal housing of the oven, you will retain the heat in the oven instead of worrying how the heat will affect the boat. You can just take off the cover and stuff in as much as possible. Ovens / Air Fryers are notoriously poorly insulated from the factory knower days.
The heat should be cooking your food not heating up the boat. The top of the oven after insulation should be about 60f not 180f.
Awesome to see so much progress.
For the exhaust ventilation of the fridge/freezer you should extend the backsplash detail along the end of the countertop but integrate a thin double walled vent chase that exhausts behind the backlighting detail. You won’t see the vent slit and spills won’t accidentally drain into it. The backsplash detail will also provide a short lip for the flat surface in front of the window if you have items sitting up there.
How about venting your fridge and freezer into the kick plate at your feet.
Not sure what is the fascination of having a "heavy" dishwasher on board? It's not like you will have busy life schedules…in fact you have a whole 24 hours to wash dishes in…..and save weight😮
for the fan on top of the counter for the fridge/freezer, how about mounting it on the bottom of the countertop and just cut slots in the counter top to let the air escape. Maybe make a cube out of countertop material and have the air vent parallel with the countertop? That way stuff doesn't drop down into the fan. I didn't see a cooktop? Maybe I was thinking about something and missed it?
Lovely to see the galley coming together with your product choices.
Great video Guy’s as always. All the best from us 🇬🇧🏴🇺🇸
For the fridge/freezer vent, why not vent it into the foredeck storage lockers? Taking that heat out of the cabin would reduce the temp in there a little bit, which would help when you're in warm-weather areas and reduce AC load when you run the AC.
I'd do the same for venting other electronics areas overboard if possible, it's likely a short enough hop to an outside area to make that fairly easy and makes the interior generally more comfortable.
You have accomplished so much, and there is so much left to do. Mind boggling.
Have a custom vent cover plate made with a custom cut out with like the boat name or palm trees or something like that, be creative and have it back lit. That would be awesome 😊