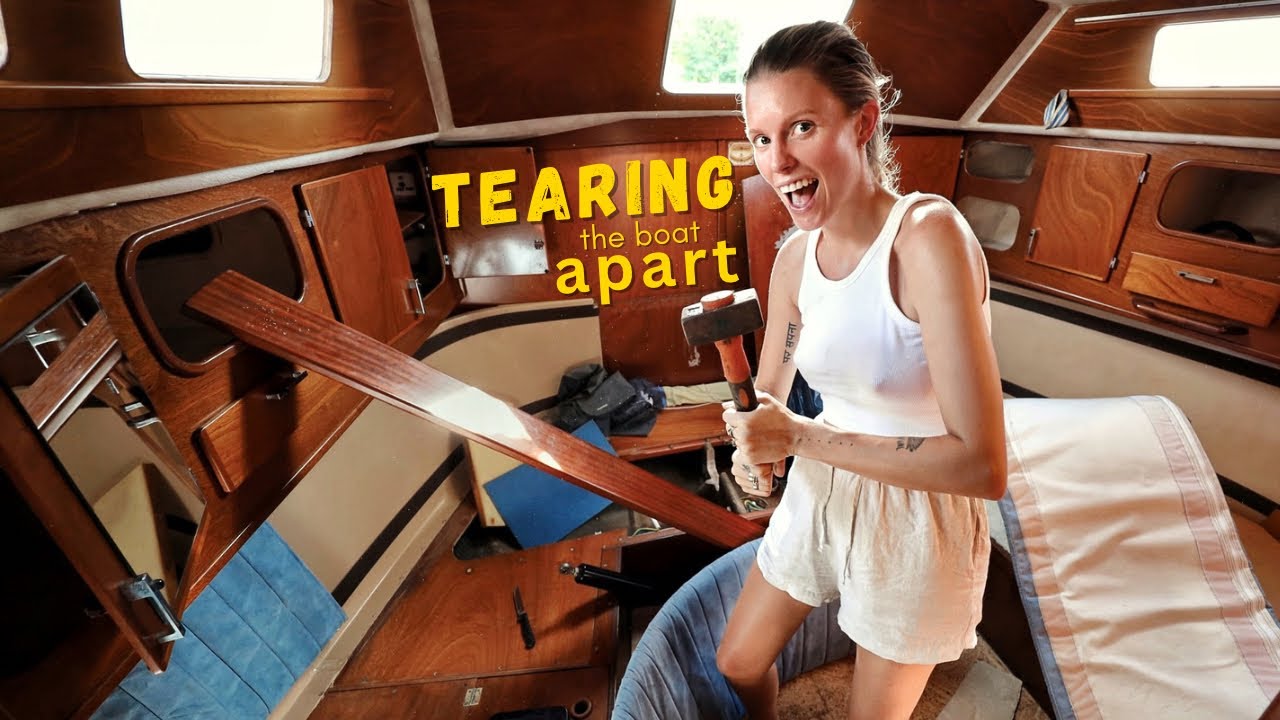
Cu motorul nostru vechi scos și repararea noastră în curs de desfășurare săptămâna aceasta, ne murdărim. Sala mașinilor a fost neglijată de ceva timp și devine misiunea mea să o aduc înapoi la strălucirea de odinioară. Isabelle face progrese solide cu sentina. În timp ce amândoi demontăm vechiul dormitor matrimonial și ne imaginăm viitorul nostru. Îndepărtând un seif și două dulapuri din cabina de la pupa, mintea noastră începe să zbârnească cu gândul la un dormitor matrimonial cu un pat queen-size adevărat, în loc de paturile tale de spumă marine pe care le-am dormit în toată viața noastră. Niciodată nu m-aș fi gândit că mă voi distra atât de mult în cel mai tare șantier de bărci, încât ai putea să faci o reparație. Alăturați-vă echipajului https://www.patreon.com/SailingMerewether Patronii noștri sunt cei care fac totul posibil și fără ei, nu am fi acolo unde suntem astăzi. Când vă înregistrați, nu numai că aveți acces la toate videoclipurile noastre cu săptămâni înainte de public, dar aveți și o linie directă cu noi și încercăm să ne cunoaștem pe toți patronii noștri. Pune-ne o întrebare, dă-ne un sfat spune-ne ce vrei să vedem, ne place să vorbim cu echipajul nostru cât de mult putem. Mărfuri, cămăși și multe altele https://sailingmerewether.com Paypal https://paypal.me/sailingmerewether?country.x=AU&locale.x=en_AU Instagram https://www.instagram.com/sailingmerewether https://www. instagram.com/neeisabelle https://www.instagram.com/kieranwyse Facebook https://www.facebook.com/sailingmerewether Sponsori și colegi UK Sailmakers – https://www.uksailmakers.com Predict Wind – https:// www.predictwind.com
source
De ce rupe barca!
47 thoughts on “De ce rupe barca!”
Comments are closed.


First
I am proud to watch you!💚
Strongly recommend a foaming degreaser and pressure cleaner for cleaning the engine room and bilges. You also need to get two or three extra battery packs or additional cordless electric tools. If you intend to really refurbish this boat, you will need lots of tools that it appears you do not have. I suggest you contact a couple of the other sailing channels, especially Mads and Ava from Sail Life. They are always willing to offer help and suggestions.
Maybe someone has commented already but, is this the same yard and apartment building that was used by Sailing Nandji? Sure does look like it.
The engine room and bilges are looking so much better – I can't wait to see when all your hard work finally pays off!
Great job guys, I truly hope you’re confident that the C drive is ok and did not need to be looked at.
The state of the engine room indicates neglect but the Amel is such a sturdy platform that the bones are in good shape. I would inspect ALL the system. Also check through hulls. Bet you there are corroded. What Ching your progress with enthousiasme
You guys just amaze me! Your courage and tenacity to get this job done is amazing. I might just find a way to put a tarp over the top. Keep the rain out and maybe keep it cool. Good luck.
The fun of remodelling your way🤙🏼🤙🏼🤙🏼🇦🇺
Keep hot grinder grit away from gelcoat !
Hello, your boat has been very poorly maintained. Very good idea to clean everything but it is imperative to check all the mechanics, also the propeller transmission etc… take the time….good luck to you both.👍👍👍👍👍
_ PLEASE Stop with all the Drone footage of the marina and more of the refurbishing and repairs. _
Det er noget af et project i har gang i. Jeg nyder jeres videoer. Glæder mig til at føgle jeres tur fremover . Hilsner fra Danmark.
If you can, galvanize all the metal in the engine room. Hot dip will give the most protection but cold sprayed will do the job just as well. It gives galvanic protection whereas 2PE only seals it from the atmosphere and is effective as long as the surface is not damaged in any way. If you want to extra protection after a patina has developed on the galvanized surface will give an extra layer of protection. Do some research. it is not foolproof but then nothing is really.
you can make a full bed no problem 😀😀😀😀
well, I notice that this beautiful AMEL IS NOT AS DAMAGED AS IT APPEARS, JUST ABANDONED, IT'S GETTING UP TIME WITH THE ENGINE BASE, THE SUPPORTS, THAT BLUE COLOR IS NOT APPROPRIATE, IT MUST BE WHITE TO EASILY OBSERVE POSSIBLE LEAKS, I SEE THAT THE INTERIOR WOOD IS VERY WELL, WITH A BLEND SPRAY YOU RECOVER BEAUTY, YOU MUST HAVE THE BEESWAX BLEND. IT'S GOING VERY WELL, CONGRATULATIONS AND BLESSINGS, I LIKE YOUR STORY MORE AND MORE COME ON, IN LESS THAN 5 MONTHS YOU WILL FINISH
PD: The primer paint on the bench is an anti-iron rust
You both amazing ! Still fingers cross.
Too bad the safe wasn't full of cash $$$ Now that would have been nice . It's going to take a while but when your done you will have a vessel you will be proud of and will be able to take you around the world in style .
I'm so happy to follow along on this refit. It is definitely going to be a lot of work but you guys have a great start. The effort put into cleaning the engine room and bilges proves to me that you two will build a boat you are proud of. Now I wait…for the next episode. Great job guys!
Have you checked out Ellebogen for motor mounts?
Hello again fellow bildge rats lol. Great job cleaning her up. When i did this job on my 42' boat it was suggested that i spray bleach upward inside the bildges to thwart any mold unseen. I did, then i scrubbed the bottom of the floor with Scotchbrite pads wherever i could get to. The black mold under there was disgusting but after hours of cleaning and drying out, the odors previously eminating from the depths were eliminated completely. Keep up the good work. You're a pair after my own bildgerat heart.;)
Get yourselfs a drill pump fast way of emptying water
Love watching your vlog remember uses neverseas the bolts when you put them back in
good job guys ! …..remember to take some time for yourselves once inna while……OnWard……..
I love the enthusiasm, you have had some difficult times and there will be more, enthusiasm can be very
Contagious.
Thanks for the videos.
What a marvelous adventure… and it will truly be yours when you are done!…. good job!
Did you get the Combination of the safe yet? might be a few lazy Dollars in it.
The cost on those motor mounts is outrageous. Those mounts should not cost over $50. With so many things manufacturers use off the shelf parts that are commonly available or available from another supplier. Recently I was having problems with one of my plasma cutters and it needed a new regulator and pressure sensor and from the manufacturer of the plasma cutter I was looking at $300 for two parts. I could clearly see the parts were made by smc and from my local pneumatic supplier I purchased both fort $25. Google lens is making it easier for people to match of parts or to find out who the original manufacturer is.
I recently needed an alternator for my Ferrari Testarossa and Ferrari sells it for $1200, the alternator is manufactured by Delco Remy and after an hour of researching part numbers and cross referencing part numbers I figured out Ferrari used the same exact alternator as a 1985 Corvette which can be purchased for around $90.
Looking good guys❤
Kieran is by far the most competent demolition man I've ever seen. I always HATED engine work, rust was my nemesis because it always seemed to meld things together never to part again. The way Kieran casually talks about "removing" this or that part and then tells us he's "just removed" something that would have taken me 24 hours back in the day, I realise how clueless I was when I clapped eyes on a boat engine the first time… When I say I knew nothing about engines, I am being kind to myself.
Your work seems to be paying off. Can't wait to see how you progress. Just wondering: the boat yard you are working in looks like the same boat yard your fellow Australian YouTubeer SV Nanji worked in. Is it?
Vinegar works good as a mold destroyer. And doesn't bother your lungs like bleach.
Hope you’re not polishing a turd. From someone who’s polished many turds. Btw, soap is a degreaser. From mold pro’s it’s two words: steam clean. Then wipe down with diluted bleach.
Before covering the rusted metal, I would use a rust converter such as Evapo-rust to neutralize the iron oxide.
Matey you need a reality check….you not getting anywhere fast with one battery. If you think that bay is clean you are dreaming get back on itandclean it properly.
safeknackers 😜✌️👍
Did you guys find the Delos distiller in the boat that goes with the large glass moonshine jug that you found ???
AWESOME ! DONT FORGET TO TAKE A DAY OFF ONCE IN A WHILE !
Use Phenyl, a heavy duty phenolic disinfectant used to clean drains, and a little kerosene, lots of old cotton waste to mop up the filthy oil and gunk. That gets rid of most of it. Then I finish using a proprietary bilge-cleaner, or a degreaser. Of course, the best is a steam cleaner, and many boatyards have one for hire. When you re-assemble the engine bed–a lick of white lead on the threads will make it easy to torque them up and will ensure they do not rust up and lock. If you can not get white lead, use some zinc oxide or lithium water pump grease.
Keep after your dreams !!! it will be very rewarding on the other side when you are done 🙂
Hey guys like your video on your drive and your bilge one thing you need to do have a good dry bilge is really good pumps a primary large capacity and a secondary backup and then on your drive my suggestion is make sure you put grade 8 stainless steel bolts actually that's what I use on everything now I'm by the top bolts. Grade 8 is really tough stuff and if they're stainless and Loctite or a thing with red Loctite also around everything good it's one thing people forget about ground he's a couple good number one size grounding cables or bigger
I only have four words – You two are great !
Gunk somehow seems very specifically descriptive.
Great to see you both upbeat and getting into it, better than a few episodes ago, keep pushing on and you are going to have a lovely boat
You two are very courageous. Best wishes for success with the repairs. Cheers!
Hey guys, do yourself a favor and build yourself a canopy over the boat. Really simple to do with 4×4 timber fence post, rachet straps, and cheap Blue/silver reflective taupe. Use a sheet rope from Mizzen to your timber Post (near the main mast step) Tension with rachet strap to bow & sidestay chainplates. On the base of the post attach a square (300x300mm) pc of 1"ply with a scrap pc of carpet on it. Post can be about 1800-2000mm high with some eye bolts. You won't regret it. stopping some of the sun's rays is a must in that climate. I have done many refits and this is the first thing I do after clearing the deck. Enjoy the journey
I hope you are getting some recycling money from all of that beautiful, but bent stainless steel.